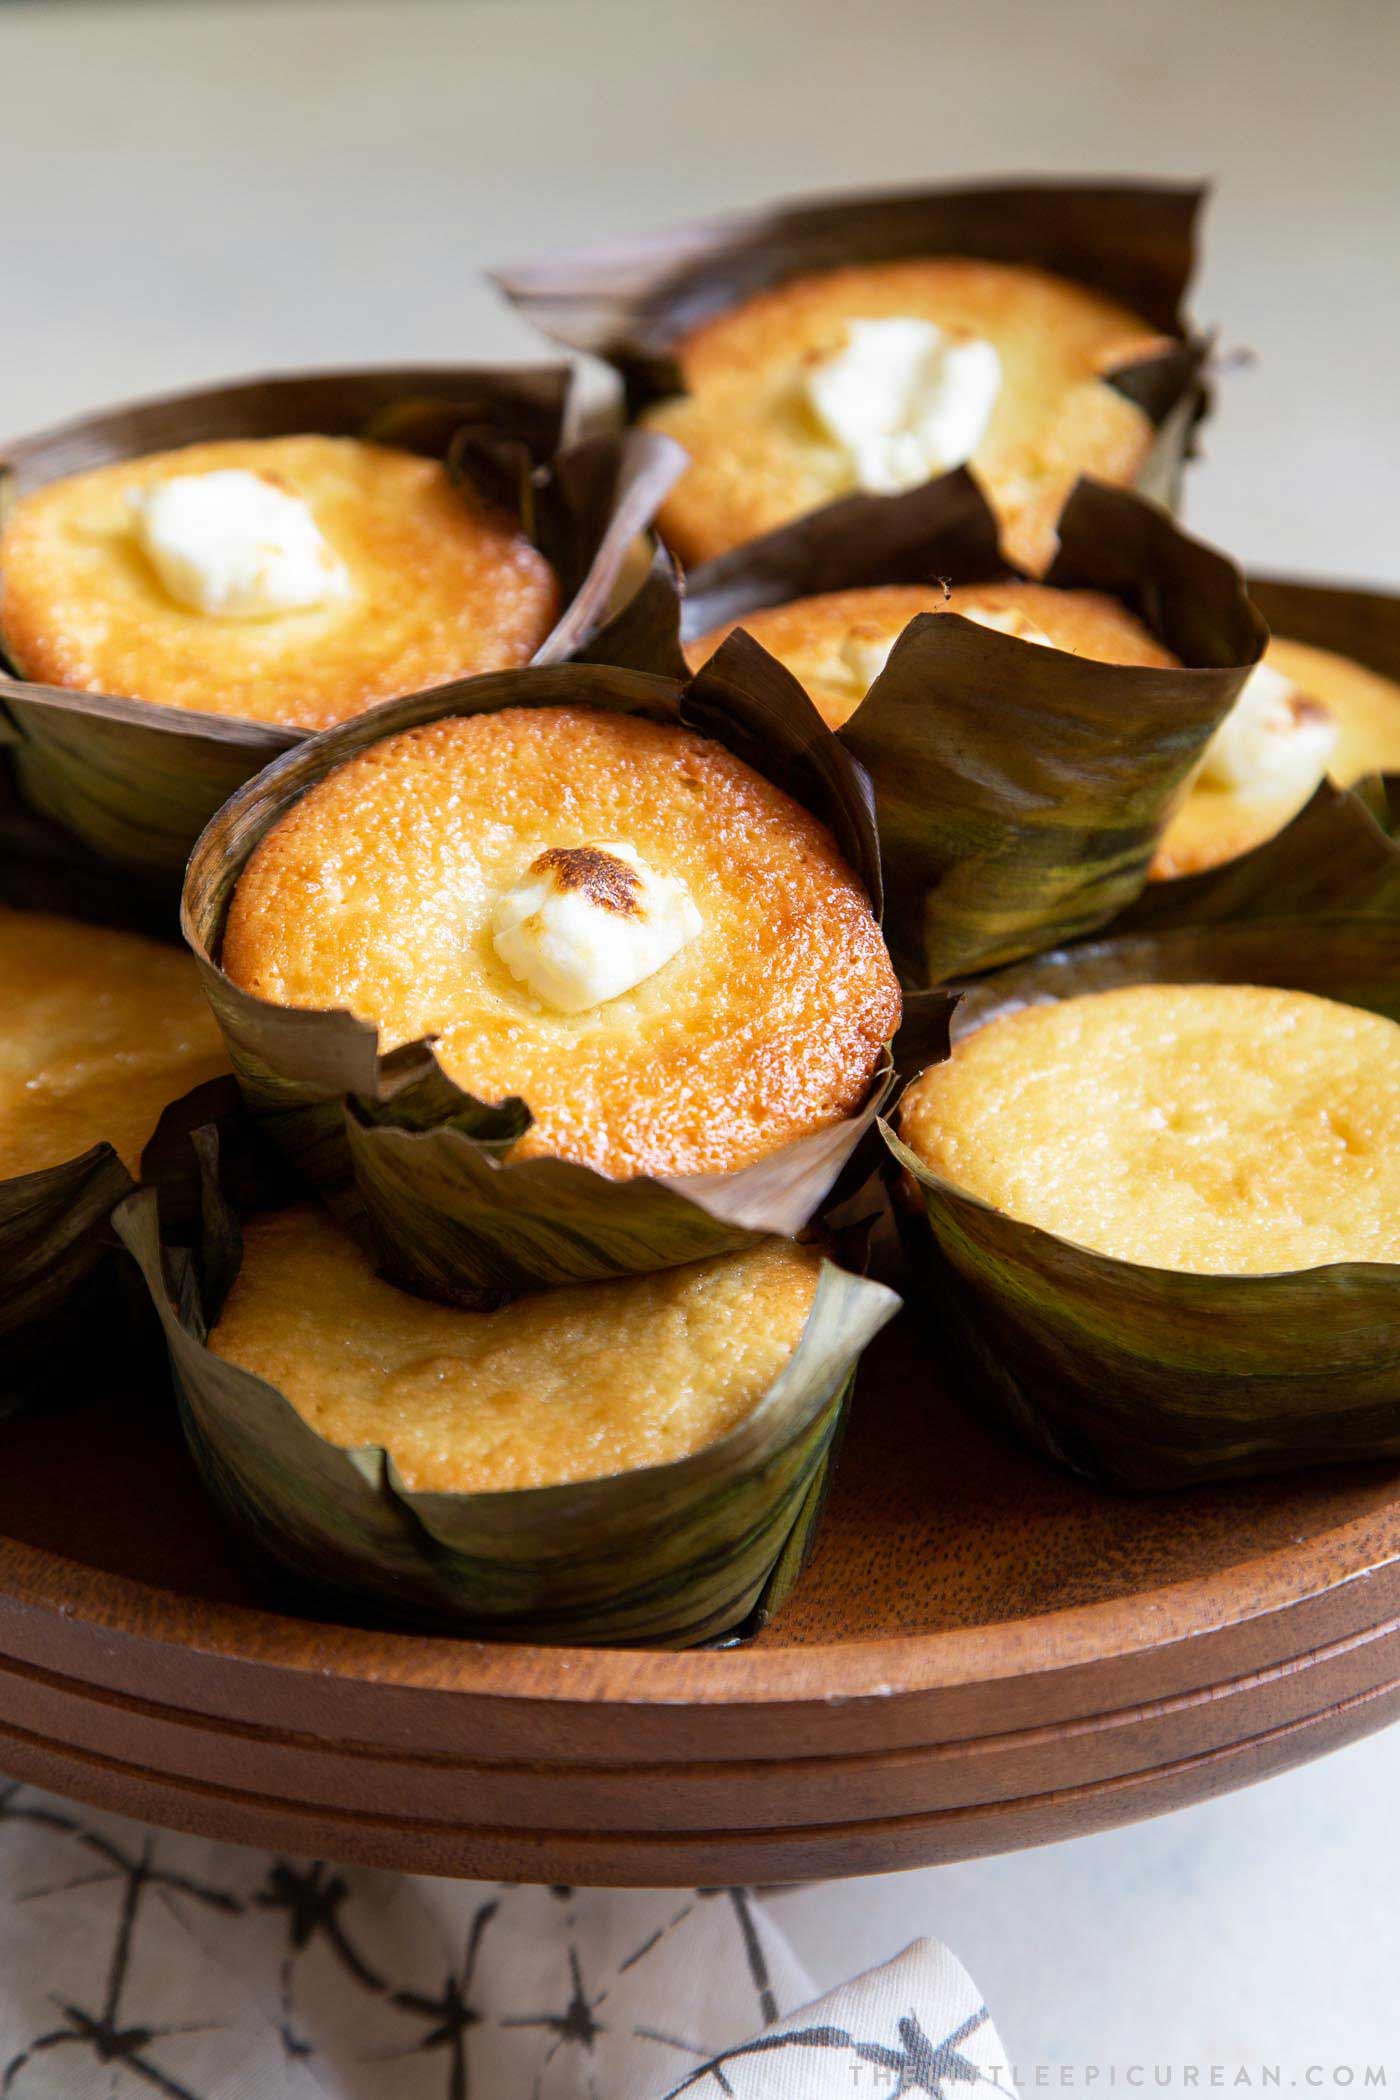
Soft and fluffy bibingka baked in banana leaf lined muffin tins. This is an easy homemade version of the popular Filipino coconut rice cake traditionally cooked in clay pots.
October is Filipino American History Month (FAHS). The first Filipinos arrived near what is now Morro Bay, California back in October 18, 1587 aboard a Spanish ship. (YES. They arrived 33 years before the English Pilgrims landed at Plymouth Rock!)
This month long celebration is meant to pay tribute to the many ways Filipino Americans have contributed to American society.
Here is a popular Filipino snack cake that is perfect during this time of year! This is an easy homemade version of the classic bibingka in high demand during Christmastime!

Fluffy Bibingka with Cream Cheese
Bibingka encompasses a wide range of baked goods. It is an umbrella term that is used to describe or name a baked dish made using rice and coconut milk.
I tried several bibingka recipes before deciding to create my own version. Some recipes call for rice flour, others use glutinous rice flour. And, then there are recipes that completely omit the rice flour and only use all-purpose flour.
I tried the bibingka recipe from both the AMBOY and I am a Filipino cookbooks. Both recipes call for glutinous rice flour. The resulting bibingka from both cookbooks were chewy and dense like mochi. That wasn’t what I was craving.
Since I wanted a soft, fluffy, pillowy bibingka…I set out to make my own recipe! Let’s begin by differentiating some of the most common versions or categories of bibingka:
VERSION #1: Bibingkang Malakit
This translates to sticky coconut rice cake. This version is better known as Biko. It is made with glutinous rice, coconut milk, and brown sugar.
VERSION #2: Cassava Bibingka
Cassava bibingka can be made with cassava flour or grated cassava root. It is usually topped with sweetened coconut cream.
VERSION #3: Bibingka Galapong
Galapong is a mixture of ground rice and water, also known as “rice dough”. It is the traditional base for bibingka. The recipe here is most closely related to this version. However, instead of making galapong mixture from scratch, this recipe uses rice flour.
Ingredients

- Rice Flour + All-Purpose Flour: More traditional recipes are gluten-free, using 100% rice flour. I find adding a small amount of all-purpose flour (wheat flour) helps to strengthen the cake and gives it a fluffy texture.
- Baking Powder: This helps to leaven the cake and make it airy and fluffy! If your baking powder is old and stale… you will end up with a dense bibingka.
- Coconut Milk: Fresh coconut milk is the best! But, it hard to come by and is quite laborious to make. Next best option is canned coconut milk. Be sure to get full-fat coconut milk that lists coconut as the first ingredient.
- Sugar: I have created this recipe using regular white granulated sugar. You may use brown sugar or muscovado sugar- however these sugars will make the resulting bibingka darker in color.
- Banana Leaves: Banana leaves are sold frozen. They are available at Asian and Latin markets. If you live in Southern California, you can find frozen banana leaves at Seafood City, 99 Ranch Market, or Super King. Banana leaves are not required, but it does add a distinct flavor.

Rice Flour vs Glutinous Rice Flour
Not all rice flours are the same! They cannot be used interchangeably in recipes.
Rice flour is milled from medium grain or long grain rice. Glutinous rice flour is milled from short grain or glutinous rice.
They feel very similar in texture and look identical upon inspection. However, these two flours result in different textures when baked or cooked. Rice flour will create a fluffy, airy cake like sponge cake. Glutinous rice flour will create a dense, sticky cake like butter mochi cake.
In general, you can differentiate the two types of rice flour by the packaging. RED packaging is used for rice flour. GREEN packaging is use for glutinous rice flour. This is helpful when the labels are not written in English.

How to use frozen banana leaves
Thaw banana leaves at room temperature, or pass them under cool running water. The banana leaves will likely be dirty or dusty. Rinse in cool water and then pat dry.
Banana leaves have a thick rib that runs down the center. Cut that portion off to make the banana leaves more pliable and easier to work with.
Use scissors or a sharp knife to cut the banana leaves to your desired portion size.
Banana leaves need to be warmed up before use. Otherwise, they will be rather stiff and brittle. Hold banana leaves using tongs and pass over a flame. Continue to do this until the banana leaf has turned shiny and deep green.
NOTE: Just be careful not to burn the banana leaf. If the leaf turns brown, you’ve gone too far. Throw that piece away and start anew.
To summarize:
- Thaw frozen banana leaves at room temperature or speed up the process by running them until cool running water.
- Rinse the banana leaves to rid of any dirt or dust.
- Pat banana leaves dry.
- Cut banana leaves to desired sizes. Remove thick rib that runs down the center of leaf, if necessary.
- Heat banana leaves over open fire. Use kitchen tongs to hold banana leaf. Pass over an open flame several times until the leaf has turned deep, bright green in color. (Be careful not to burn the leaves!)
How to bake bibingka in a muffin tin
Bibingka is traditionally baked in banana leaf lined clay pots heated over an open fire. Clay pots are great conductors of heat. The open fire slightly burns the banana leaves imparting a nice flavor.
For the home kitchen, I suggest baking bibingka in large muffin tins! This isn’t your standard 12 cavity muffin tin. The giant muffin tin photographed above is a 6-cup muffin tin. (Scroll down for more information regarding muffin tin and baking vessel choices.)
Start by preparing the banana leaves as directed above. Cut the banana leaves to your desired portions. Use a 5.5 or 6-inch square banana leaf for the 6-cup muffin tin.

- Brush the muffin tin cavities with melted butter.
- Press prepared banana leaf into muffin tin. Brush banana leaf with melted butter.
- Pour 1/2 cup portion of bibingka batter into banana leaf lined muffin tin.
- Bake at 375 degrees until bibingka is golden around the edges!

Topping Choices
Bibingka is traditionally topped with hard boiled sliced duck egg, grated salty hard cheese, or freshly grated coconut meat. Choose one or use a combination of all three!
These toppings really complement sweet delicate flavor of bibingka. However, they may be difficult to find or a bit overpowering for your first time.
I suggest starting with a small slice of cream cheese. This is better suited for the American kitchen. The slightly salty and tangy cream cheese pairs wonderfully with fresh baked bibingka.

Serving Suggestions
The banana leaf lightly tints the exterior edges of the bibingka. It impacts a distinct delicious flavor!
This bibingka is soft and fluffy fresh the oven and best served warm. Ideally, serve on the same day it is baked.
Overtime, the bibingka will harden and stale. Store at room temperature until ready to enjoy. Store in the fridge if the bibingka is topped with cream cheese, cheese, or duck egg. Reheat in the microwave or toaster oven to refresh.

Alternative Baking Vessels
- standard muffin or cupcake tin
- cast iron skillets
- round cake pans
- square baking pans or rectangle casserole pans
I highly recommend using the giant 6-cup muffin tin.
Banana leaf impacts a distinct flavor that is difficult to mimic. Should you choose to use regular cupcake liners, I suggest adding a touch of vanilla extract to the batter. (See notes in recipe for further instructions.)

You may also use a standard 12-cavity muffin or cupcake tin. If you do not have access to banana leaf, you may line the tin with regular cupcake liners or parchment paper.
Use 1/4 to 1/3 cup of bibingka batter for standard sized muffins. Reduce baking time by 3-5 minutes.

For larger sliceable bibingka, bake the batter in one 9-inch to 12-inch skillets. Batter may also be baked in 9-inch square baking pans or standard 8- or 9-inch round cake pans.
Recipe will also work in a 9 x 13-inch casserole dish.

More Filipino Recipes
- Boiled Peanuts (Nilagang Mani)
- Taho (Sweet Tofu with Brown Sugar Syrup)
- Turon (Fried Saba Banana Rolls)
Bibingka Coconut Rice Cake
Ingredients
- frozen banana leaves, as needed to line molds or tins
- melted unsalted butter, for brushing
- 180 grams rice flour*
- 45 grams all-purpose flour
- 24 grams baking powder, (2 Tablespoons)
- ¼ teaspoon kosher salt
- 4 large eggs, room temp
- 300 grams granulated sugar
- 13.5 oz can full-fat coconut milk, well-shaken
- 57 grams unsalted butter, melted
- block cream cheese, thinly sliced, as needed for topping
Instructions
- Thaw frozen banana leaves at room temperature. Or, quickly thaw them under cool running water. Rinse banana leaves to remove any dirt or dust. Pat dry with paper towel or cloth kitchen towel.
- If necessary, remove thick rib that runs down the center of banana leaf. Use scissors or sharp knife to cut banana leaf to fit baking vessel.
- Use kitchen tongs to hold banana leaves. Pass over an an open flame (such as gas stove burner) several times until banana leaf is shiny and deep green. Repeat will all banana leaves. Set aside. NOTE: This is make the banana leaf more pliable and easy to work with. Be careful not to burn the banana leaf.
- Grease giant muffin tin with melted butter. Press banana leaf into muffin tin cavity to line the mold. Brush banana leaf with melted butter. Set aside and prepare batter.
- Preheat oven to 375°F (190°C).
- Sift together rice flour, all-purpose flour, baking powder, and salt in a medium bowl. Set aside.
- In a large bowl, whisk eggs until yolks are broken. Add sugar. Use an electric hand mixer or a sturdy whisk to beat eggs and sugar until smooth. Add coconut milk and melted butter. Beat together until well combined.
- Add half of dry rice flour mixture. Stir to combine. Add remaining rice flour mixture. Mix until batter is smooth and there are no dry streaks of flour.
- Add 1/2 cup portions of batter into prepared giant muffin tin. Bake for 20 minutes. Add slices of cream cheese on top of each bibingka. Bake for another 10-15 minutes until cakes are set and toothpick inserted in cake comes out clean.
- Unmold bibingka from giant muffin tin. Bibingka is best served warm, fresh from the oven.
Notes
- Do not use glutinous rice flour, which is made from short grain rice. Glutinous rice flour uses GREEN packaging.
- This is helpful when the labels are not written in English.
- RED= Rice Flour
- GREEN = Glutinous Rice Flour
- Rice flour will create airy sponge cake- like texture. Glutinous rice flour will result in dense, sticky cake.
- Frozen banana leaves are available at well stocked supermarkets and widely available at Asian or Latin markets.
- You may use parchment paper or cupcake liners in place of banana leaf.
- Giant muffin tin will yield about 14 portions
- Standard muffin tin will yield about 21 portions
- Batter can also be baked in one 9-inch to 12-inch cast iron skillet, two 8-inch round cake pans, or two 8-inch square pans, or one 9 x 13-inch casserole dish
Nutrition
Nutrition information is automatically calculated, so should only be used as an approximation.
 Like this recipe? Rate & comment below!


Hello, I have 2 questions:
1. If I want to use salted egg, can I add it on top of the batter BEFORE baking? Or is it better to add it after 20 minutes of baking?
2. 2 TBSP of baking powder seems like a lot – I’ve seen other recipes that use TSPs not TBSP. I’ve never used that much baking powder in any recipe – is it meant to be TSPs?
1) If you add the salted egg before baking, it will just sink. I suggest adding it after 15-20 minutes of baking to ensure the salted egg stays afloat.
2) I used two tablespoons of baking powder or 24 grams.
Could I use a mini muffin tin? How would I change the recipe timing? Trying to make smaller sample sizes for culture night at a school.
I don’t recommend mini muffin sizes. The bibingka batter will bake up a bit dry when portioned out that small.
Thank you!!!! ? I tried SO many recipes before finding yours…this is exactly what I was looking for! The texture is heavenly. Thank you for taking the time to write this – it is absolutely my favorite by far!
I wish you have the cups conversion too not just grams.
For best results, I developed this recipe using weight measurements.
Hello, any tip from getting the batter in between the banana leaves?
How do I keep batter from going to bottom and not have layers of banana leaves in between the bibingka.
Hi, thinking about making this recipe GF by replacing the plain flour with rice flour… what do you think? :)
Can you add the jarred coconut strips to this recrpie?
Yes, you can add the jarred coconut strips. The resulting bibingka will be very sweet, though.
I just made that cake.
Wonderful. Very tasty, my family loved it.
thank you.
Thank you for trying the recipe and sharing your experience! I’m happy to hear you and your family enjoyed it!
Hi Maryanne, thanks for sharing your recipe. Just wanted to check if your weights for the 2 cups of rice flour is accurate? 180 grams for two cups feel low. Thank you.
Yes, the correct measurement is 180 grams. I have removed the cups measurements to make this recipe more accurate. Rice flour can be tricky to measure depending on whether you scoop or pack in the flour.